A frantic search in your old wooden cabinet, walking barefoot on the
grass, and moving your old furniture are simple tasks that are part of
your everyday life.
These can be accompanied by a small sliver of glass or wood penetrating and lodging itself underneath your skin. Refusing to budge out from your skin, splinters can annoy you and inflict a surprising amount of pain in some cases.
Splinters are small fragments of foreign bodies such as wood, metal, or glass that can pierce and get lodged in the subcutaneous tissue of your skin.
Besides being painful, splinters are foreign bodies that can pave the way for the microbial intrusion, which can result in inflammation and infection characterized by redness and swelling in the affected area.
To avoid further damage, splinters should be removed carefully as soon as possible. While inorganic matter such as plastic, glass, and metal can be removed in a less limited time frame, organic vegetative matter such as wood, plant and animal spines, cactus, and rose thorns need to be dealt with immediately.[1]

Outlined below is a list of easy-to-do methods to remove a splinter safely without any pain.
Just apply a thick layer of glue (not instant adhesive, though) on the affected area, leave it on for at least 30 minutes or until it dries completely, and then peel off the glue. The splinter will stick to it and come off quickly, without any pain.

Baking soda causes the skin to swell. This pushes the splinter out to the surface, so you can easily pull it out with a pair of sterilized tweezers.

It is mostly used for removing splinters in the hands and feet.

Epsom salt draws water out of the skin cells and shrinks them. This causes the splinter to come up to the surface, ensuring a painless removal of the sliver.

Banana peel contains enzymes that will help soften the skin and push the splinter to the surface. In addition, the moisturizing and antimicrobial properties of the banana peel will prevent any further infection.


Anything that penetrates the skin creates a channel of entry for foreign particles including disease-causing microbes.
Organic splinters such as wood and grass blades are replete with resins, oil, and bacteria and fungi that feed on them. The entry of an organic splinter can act as an inlet of infection and cause inflammation and immune responses.
Unattended organic splinters can pose health risks, such as:
It is advised to have a splinter of any kind removed. Poking around the fragment will only aggravate your chances of an infection.
Before you try your hand at removing a superficial splinter at home that has not come out on its own, you must take a few things into account:
Many safe and simple home remedies will make it easier for you to get rid of splinters and prevent any infections.
It would be best if you keep a watch on specific symptoms associated with infection at the site of the splinter.
These symptoms are indicative of an infection and call for a physician’s visit rather than self-care:
It is best to try your hands at getting out a superficial splinter naturally using any of the above mentioned home remedies.
Even though it might seem to be a trivial thing, but removing a splinter is essential to avoid infection. Seek immediate professional help if you have an elusive splinter or a splinter that is deep-seated or you observe any signs of infection such as bleeding, redness, swelling, and pus on the entry site of the splinter.
Source Click here
These can be accompanied by a small sliver of glass or wood penetrating and lodging itself underneath your skin. Refusing to budge out from your skin, splinters can annoy you and inflict a surprising amount of pain in some cases.
Splinters are small fragments of foreign bodies such as wood, metal, or glass that can pierce and get lodged in the subcutaneous tissue of your skin.
Besides being painful, splinters are foreign bodies that can pave the way for the microbial intrusion, which can result in inflammation and infection characterized by redness and swelling in the affected area.
To avoid further damage, splinters should be removed carefully as soon as possible. While inorganic matter such as plastic, glass, and metal can be removed in a less limited time frame, organic vegetative matter such as wood, plant and animal spines, cactus, and rose thorns need to be dealt with immediately.[1]
Contents
Simple Ways of Removing Splinter at Home
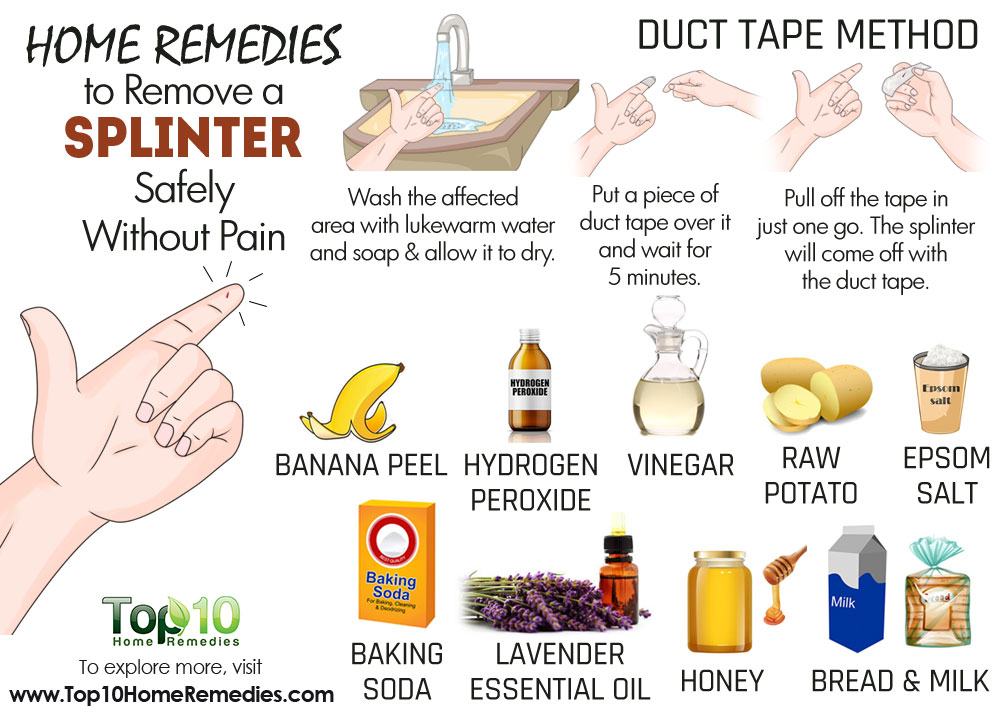
Outlined below is a list of easy-to-do methods to remove a splinter safely without any pain.
Caution
- Always wash your hands and the affected area with antiseptic soap and lukewarm water irrespective of the remedy being used.
- Sterilize your tweezers before pulling a splinter out to avoid infection.
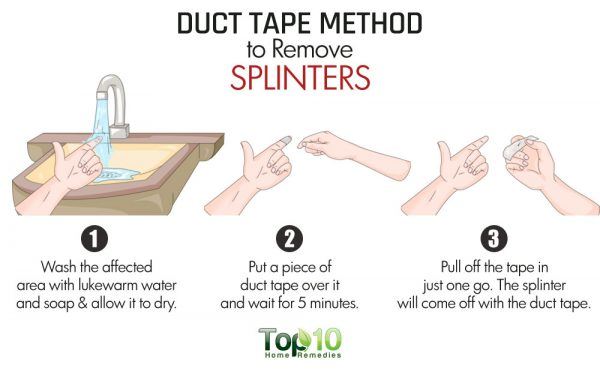
1. Stick Duct Tape
One of the most conventional methods to remove a splinter is using duct tape. This simple remedy works best for splinters that are partly sticking out of the skin.
- Use lukewarm water and an antiseptic soap to wash the skin around the splinter. Allow your skin to dry.
- Put a piece of duct tape over the splinter area.
- Gently rub over the top of the tape using your fingertip.
- Wait for 5 minutes, and then pull off the tape in just one smooth motion in the direction opposite to that of the splinter. The splinter will come out with the duct tape.
- Finish by cleaning the area with lukewarm water.
Just apply a thick layer of glue (not instant adhesive, though) on the affected area, leave it on for at least 30 minutes or until it dries completely, and then peel off the glue. The splinter will stick to it and come off quickly, without any pain.
2. Pull Out Your Splinter with a Medicine Syringe
Using a medicine syringe is an easy life hack for painless splinter removal, particularly for your kids. The syringe is likely to pull out the splinter effortlessly in one go without any pain.- Grab a pediatric medicine syringe (e.g., Calpol syringe)
- Place the syringe over the surface of the splinter such that the small hole at the bottom of the syringe covers it properly.
- Make sure there are no gaps.
- Pull the syringe quickly once you are sure about the setting.
- The quick pull of the syringe will suck the splinter out.
Caution:
Do not perform this if the splinter is deep-seated in the skin and/or
there are visible signs of infection such as redness, swelling, pus, and
pain. Instead, seek medical attention.
3. Apply White Vinegar
The acidic nature of vinegar will cause the splinter to break through the surface of the skin, enabling an easy splinter removal.
- Pour some white vinegar into a small bowl.
- Soak the affected area in it for 15 to 20 minutes.
- Check whether the splinter has risen sufficiently out of the skin’s surface. If so, pull it out using a sterilized tweezer. If not, continue soaking it until it rises to the surface.
- After you’ve removed the splinter, rinse the skin thoroughly with lukewarm water.
4. Smear Baking Soda Paste
Baking soda is an excellent remedy for both splinters that are superficial and splinters that are embedded in the skin.Baking soda causes the skin to swell. This pushes the splinter out to the surface, so you can easily pull it out with a pair of sterilized tweezers.

- Mix a small amount of water and 1 tablespoon of baking soda to form a thick paste.
- Smear the baking soda paste on the affected area. Place a Band-Aid on the site.
- After 24 hours, remove the Band-Aid.
- If the splinter is visible, pull it out with a sterilized tweezer. If not, repeat the method with fresh baking soda paste and another Band-Aid.
- After you’ve removed the splinter, rinse the skin gently with lukewarm water.
5. Soak in Hydrogen Peroxide
Hydrogen peroxide is a disinfecting agent. The application of hydrogen peroxide can cause swelling and allow the splinter to come out to the surface.It is mostly used for removing splinters in the hands and feet.

- Soak a cotton ball in 3% hydrogen peroxide.
- Place the cotton ball on the affected area and secure it in place with tape.
- Leave it on for a couple of hours.
- Remove the cotton ball and carefully pull out the splinter with a pair of clean sterilized tweezers.
- Finally, rinse the area thoroughly with lukewarm water.
6. Apply an Epsom Salt Poultice
An Epsom salt poultice is an effective remedy for a deeply lodged splinter.Epsom salt draws water out of the skin cells and shrinks them. This causes the splinter to come up to the surface, ensuring a painless removal of the sliver.

- Put a pinch of Epsom salt on a bandage.
- Apply the bandage over the affected area. Ensure that the salt is in contact with the area where the splinter is embedded.
- Leave it on for the entire day.
- Remove the bandage in the evening.
- You can see that the splinter is drawn out. Now, pull it out with a pair of clean sterilized tweezers.
- Repeat the process if needed.
7. Put a Banana Peel
Use a ripe banana peel to pull out a splinter without any pain.Banana peel contains enzymes that will help soften the skin and push the splinter to the surface. In addition, the moisturizing and antimicrobial properties of the banana peel will prevent any further infection.

- Cut a small piece of banana peel.
- Place the peel with the white side down on the affected area, and secure it in place with tape.
- Leave it on overnight.
- The next morning, remove the splinter with a pair of tweezers.
8. Use a Raw Potato Slice
Raw potato slices can be used for the removal of a partially visible splinter.
- Wash a raw potato thoroughly and cut off a slice.
- Place the potato slice on the splinter, making sure the fleshy part touches the splinter.
- Gently press the potato slice down so that the splinter pierces the potato.
- Carefully remove the potato slice, along with the splinter.
9. Apply Lavender Essential Oil
The Lavender essential oil is accredited with anti-inflammatory and antimicrobial properties. It also helps prevent infection and aids in the quick recovery of the skin.
- Apply a few drops of lavender essential oil on the affected area.
- Leave it on for a couple of hours.
- From time to time, check whether the splinter has risen to the skin’s surface.
- Once you notice that the sliver has moved up, pull it out carefully using a pair of tweezers.
10. Spread Honey on the Affected Area
Honey is composed of natural moisturizing and antiseptic properties to soothe the skin and prevent any infections. Honey can help dislodge a splinter and move it towards the surface for easy plucking.
- Lather the affected area with a generous amount of honey.
- Put a bandage over it and leave it on overnight.
- The next morning, pull the splinter out carefully using a pair of sterilized tweezers.
- After rinsing the area with lukewarm water, reapply some honey to help the skin heal.
11. Apply a Bread and Milk Poultice
Another excellent home remedy for removing a splinter is bread and milk. This is every mom’s recipe that has been used for centuries. The splinter tends to slip out of your skin along with the bread and milk poultice.
- Dip a piece of bread in some warm milk. Apply this poultice on the area with the splinter and secure it with a bandage.
- Leave it on overnight.
- Remove the dressing the next morning. The splinter should come out with it.
- Finish by cleaning the affected area with lukewarm water to prevent an infection.
Types of Splinter Injuries
- Superficial horizontal splinters: These are easily visible and can be examined and inspected by physical touch.
- Vertical splinters: These are the foreign bodies that have lodged themselves perpendicular to the skin surface. These are more painful and are difficult to remove.
- Deeper, elusive splinters: These are submerged deep into the skin tissue and come in close contact with structures such as nerves, tendons, and blood vessels. The process of searching the splinter can be time taking; hence, it should be examined in a set time limit to avoid damage to the surrounding tissue.
- Subungual splinters: These are wood splinters that go under the fingernails, toenails and beyond. These can inflict severe throbbing pain.[1] Usually, subungual splinters are buried in the distal portion, but in cases where it has landed in the proximal portion, care should be taken while removing the splinter. Disturbing the nail matrix can result in nail dystrophy or failure of the nail to grow back.
Is it Necessary to Remove a Splinter?
As soon as we are aware of a splinter, we start digging and poking it with a tweezer or a needle in a bid to remove it. We have all been there and done that to ourselves.Anything that penetrates the skin creates a channel of entry for foreign particles including disease-causing microbes.
Organic splinters such as wood and grass blades are replete with resins, oil, and bacteria and fungi that feed on them. The entry of an organic splinter can act as an inlet of infection and cause inflammation and immune responses.
Unattended organic splinters can pose health risks, such as:
- The bacteria on an untreated entry site of a wood splinter can cause a disease called bacterial tetanus, which is marked by muscle spasms throughout the body and locking of the jaws.
- The bruise caused by the thorns of the rose bushes can cause a disease called the rose gardener’s disease (sporotrichosis). The fungal load that enters your skin through the thorn splinter gives you painful sores, a characteristic feature of this disease.
It is advised to have a splinter of any kind removed. Poking around the fragment will only aggravate your chances of an infection.
Is it Okay to Remove Your Splinter at Home?
Most of the superficial splinters are likely to work out their way. However, this is not the case for a deep-seated sliver. The process is time taking, and it is recommended to seek your doctor’s help in such cases.Before you try your hand at removing a superficial splinter at home that has not come out on its own, you must take a few things into account:
- Location: Usually, superficial splinters that land on the hands or the feet can be dealt with. However, visible splinters in sensitive spots such as the eyes should not be touched.
- Depth: This refers to the magnitude of penetration of the splinter. Deep-seated splinters should be left for the physician to manage.
- Size: The size of splinter determines the ease of removal. Larger splinters can be grasped easily and removed, whereas it is difficult to grasp a smaller splinter.
- Direction: This refers to the direction of the splinter-horizontal versus vertical. Horizontal splinters are easier to remove without injuring the surrounding tissue.
Many safe and simple home remedies will make it easier for you to get rid of splinters and prevent any infections.
When to See a Doctor
It is very rare to notice a splinter until it causes you a good deal of pain or it becomes infected. Before you set out to pull your splinter out, make sure it is not contaminated or elusive.It would be best if you keep a watch on specific symptoms associated with infection at the site of the splinter.
These symptoms are indicative of an infection and call for a physician’s visit rather than self-care:
- Redness
- Swelling
- Excessive pain
- Splinter area is warmer
- Pus formation
- Fever
- A deeply embedded splinter
- A splinter that is either hooked or barbed
- A splinter that is quite small or very large and difficult to remove
- A splinter located in a sensitive region such as the eyes
- Your last tetanus booster was administered 5 years ago or more
Additional Tips
- Make sure you wash the affected area before and after splinter removal.
- Keep the area clean until it is completely healed.
- Don’t squeeze a splinter forcefully in an attempt to push it to the surface. It could break into tiny fragments, making it even more difficult to remove.
- Sterilize the tips of your tweezers with rubbing alcohol.
- Always consult a doctor if you notice any signs of an infection.
Closing Note
Splinters are a common cause of minor pain and annoyance. Constantly picking on a splinter or leaving a splinter unattended can damage the surrounding tissues and increase the likelihood of infection.It is best to try your hands at getting out a superficial splinter naturally using any of the above mentioned home remedies.
Even though it might seem to be a trivial thing, but removing a splinter is essential to avoid infection. Seek immediate professional help if you have an elusive splinter or a splinter that is deep-seated or you observe any signs of infection such as bleeding, redness, swelling, and pus on the entry site of the splinter.
Source Click here
Comments
Post a Comment